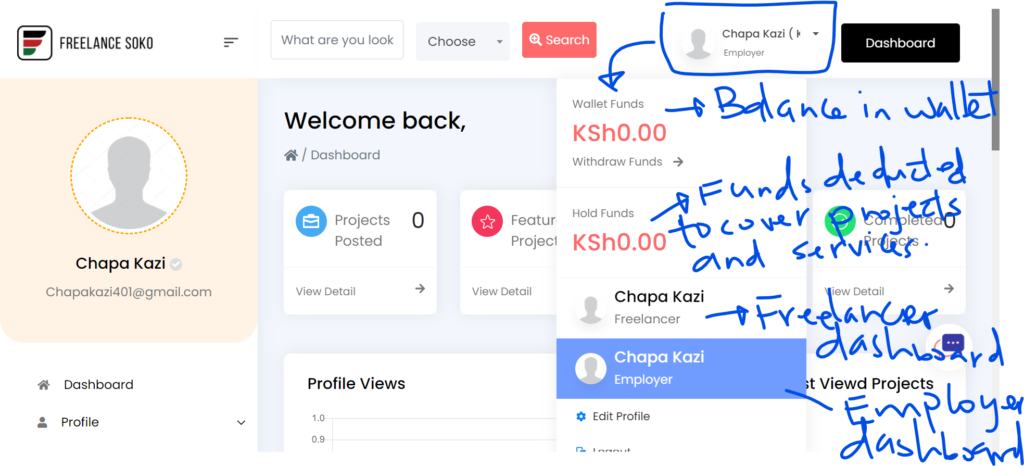
How to Access Your Dashboard
Register or Sign in to get into your dashboard.
NOTE: Each account has two dashboards; Employer dashboard and Freelancer dashboard.
You can switch between the dashboards to serve your needs. You do this by clicking on the drop down next to your name on the top right of the screen. Click on Freelancer to access the freelancer dashboard, and Employer to access your employer dashboard.

The wallet is shared by the two dashboards
The Employer Dashboard
The Employer Dashboard allows you to post projects, hire freelancers and buy services offered by freelancers on Freelance Soko.
The dashboard has the following items on the left hand side menu
How to Create Project
Locate Projects on the left menu, from within the employer dashboard. Click on the drop down and click on Create Project.
Fill in all the fields in the Create Project page, and click Create Project at the bottom to post the project.
Once project has been posted, it can be viewed by freelancers. Freelancers are able to send their proposals, if interested in the project.
How to Edit/ Cancel Posted Project
Click on the Posted Projects tab under Projects to access posted projects. This give you the option to edit or cancel your project.
Now you have to wait for freelancers to send their proposals, before you can chat with and hire the right freelancer.
You will be notified via email and within the dashboard notifications of any new proposals that you receive.
How to Send Invites to Freelancers
Not getting any or enough proposals you like, or have preferred freelancers you would like to invite to send their proposals?
You can send invites to freelancers so that they can send their proposals for your consideration.
Go to the Freelancer search page, to send invites to freelancers.
Search for freelancers using skills or display name, choose Freelancer under choose category and click search.
On the Freelancer Search page, you can further refine the search to find the right freelancers.
To send an invite, view a freelancer’s profile
On the Freelancer’s profile, click Hire Now button.
Select the project (that you have already posted) you would like to send an invite for.
Click on Send Invitation to send the invite
Once an invite is sent, the freelancer is notified via email. If the freelancer can help, they should send their proposal for your consideration.
How to Assign Project to Freelancer
Once you start getting proposals, click on the Posted Projects tab on the menu under Projects. You should be able to see proposal count under proposals. Click on Proposals to view all available proposal.
You have the option to Chat with freelancer and/ or hire them. Clicking on Chat launches the Chat between you and the freelancer.
Once you are ready to choose the right freelancer, you can hire them by clicking on the Hire Now button. Confirm the prompt to proceed with the hire.
If the required amount is in your wallet, it will be deducted when you hire the freelancer. However, if the wallet balance is insufficient, you will be taken to Checkout, where you can load money into your wallet via MPesa. Fill in the relevant fields, matching the MPesa details of the account to make the required payment.
How to Buy a Service
If not interested in waiting for freelancers to send their proposals, there is an option where you can purchase a freelancer’s services, to hire them. It is a quicker and faster way of getting the job done. Please chat with the freelancer before purchasing any service, just to be sure they understand your requirements, and are in a position to work on your order.
From within the dashboard, using the search tool, enter the right skill term you need. Under Choose category, select services. This will take you to the Search Services page.
From the Service Search page you can refine the search further.
Choose from the results the service that best suits your needs.
From within the service, you can view service description, seller details, reviews among other things related to the service.
You can chat with the freelancer offering the service, or share the service on social media (Facebook, LinkedIn, Instagram, Twitter and Pinterest)
You can also save the service for later. This can be accessed from the dashboard under Saved Services on the left side menu.
You can purchase the service by clicking on the Purchase Now button on the right. Confirm the prompt to proceed.
If the balance in your wallet is sufficient to cover the cost of the service, then the entire amount, including admin service fee, will deducted. However, if there is insufficient balance, you will be redirected to Checkout.
Fill in the correct information. Name should match the details in the MPesa number used for payment.
NOTE: The system automatically calculates the required total, including the admin service fee, that you are required to deposit into your wallet. All you need to do is enter your Mpesa pin, once you receive the prompt on your phone.